Friday, August 31, 2012

My Special Franken Polish

There are lots of FB groups for polish lovers as well as groups where you exchange polish every month.  I have a birthday group, which is where you buy a polish gift for a different girl during her birthday month.  Then when it's your birthday month, you sit back, relax and enjoy 11 gifts sent to you, make sense?  Well, I wanted a little group where every one received a small gift every month.  I created my Round Robin group which consist of 5 girls and a new theme each month.  We alternate who we buy for each month.  Sadly, August was our last month :(  But we had a cool theme.  Franken!  I have never made polish, mixed it or anything of the sort.  I am proud to say that my girl for August LOVES the polishes I made for her.  I am so happy cause I was a little worried LOL  I got super lucky though.  One of the gals in my group creates and sells polish as a home hobby.  She had me for August!!  YAY!!  She made me 2 awesome polishes.  Today I am going to share with you  a pink glittery holo with some flakies in it.  I layered 2 coats over black and I LOVE IT!!!!!

Base Coat:  Rejuvacote
Base Color:  WnW Ebony Hates Chris
Holo:  Sassy Lacquer Custom
Top Coat:  Seche Vite

I am pretty bummed about the shrinkage, but that has nothing to do with my perfect franken.  It happens some times with Seche Vite :(  

Carrie has a new line coming soon, you should check out her store HERE

Thanks for stopping in!

Guest Blogger Friday: A Little Polish

Happy Friday!  Today's guest blogger is Stephanie from A Little Polish.  I love her blog, her mani's, her style, everything!  She has some great designs and I am happy she agreed to post for me :)

*********************************************************************************

Hey Ladies, this is Stephanie from A Little Polish. I was so excited with Mandy asked me to do a guest post for her. I love her blog, and she has great nails, art, stamping, blogging, etc.. the list goes on and on!

For this mani I decided to do something freehand so I went simple with some leopard print accents. I'm calling it "Mint Chip Leopard" in my mind.


For this mani I started off with two coats of Finger Paints "Pistachio" and layered OPI "Pirouette My Whistle" over top. For my accent nails I used Sinful Colors "Snow Me White" and Kiss Nail Art Striper in Black. My leopard print isn't the best in the scheme of all bloggers out there, but one thing that I like about this print is that anyone can do it if they try and with all animal prints, and everything in nature, there is no right or wrong and everything is unique :)

Do you ever do animal print manis? What is your favorite?

Thanks again to Mandy for having me guest post on her blog. Hope you enjoyed seeing my Mint Chip Leopard Mani!


Friday, August 24, 2012

Guest Blogger Friday: Karinea0a

Today's guest blogger for Guest Blogger Friday is Karine from Karinea0a.  I am so glad she joined the series.  We did the Spring Challenge together and are now doing the Lazy Days of Summer.  I enjoy her mani's very much, I am sure you will too :)

*********************************************************************************


Hello Lovelies!

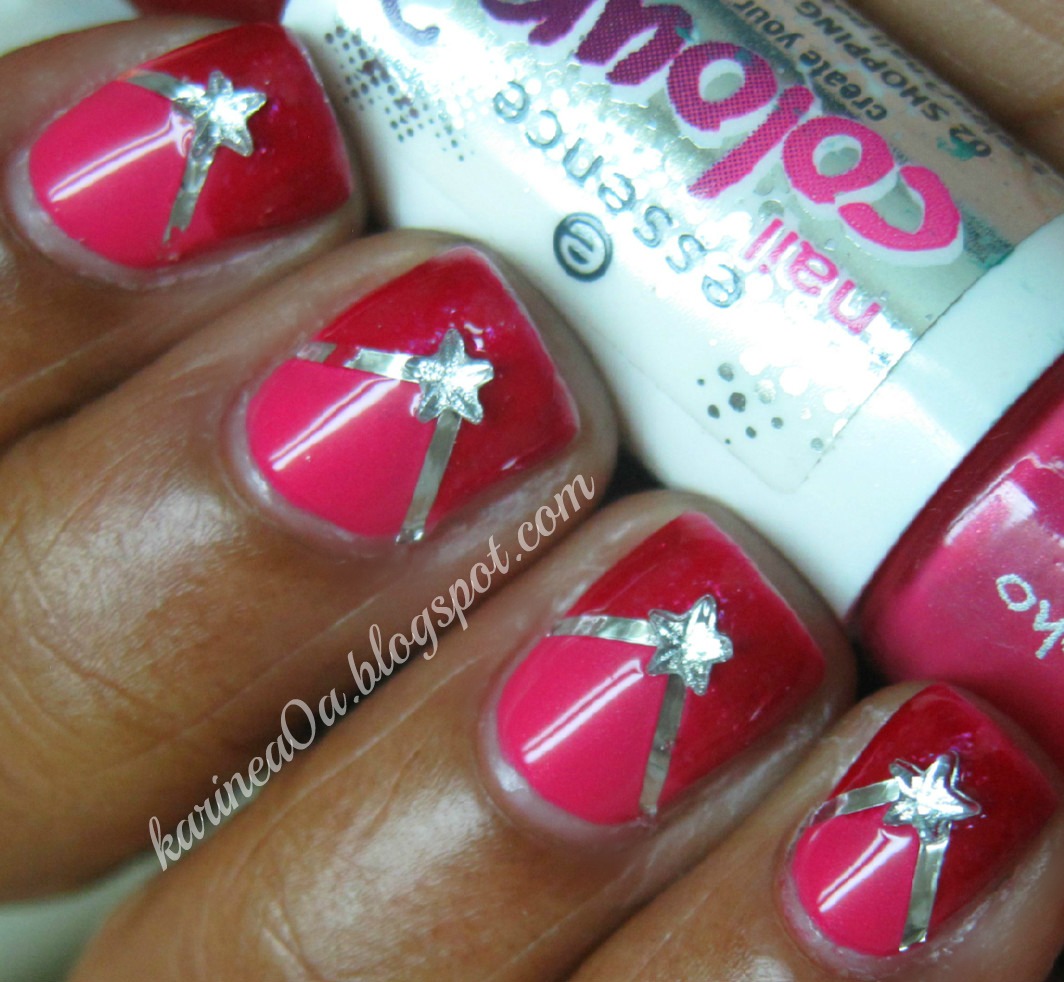
My name is Karine and I'm very excited, although nervous to talk to you today :), this is my first guest post and I am truly honored that it came from a polish sister. I was introduced to Mandy via a Spring challenge, and let me tell you, I thought a long time about what I wanted to do as this lady got skills! Today, I am showing you a simple striping tape nail art. It's summer and pink never gets boring during this season, so I choose the Essence duo Shopping Trip In Soho and Party All Night Long. On to the pics!


Thank you for reading and I hope you enjoyed it :)

Thursday, August 23, 2012

Guest Post for Karinea0a

Guest posts 2 days in a row?  Yeah, it happened.  Not on purpose.  As I said before, I love guest posting.  It just so happened that the 2 gals I posted for scheduled them right next to each other.  Works for me!  
Here is a sneak peak of my post 


Head on over to see Karine for the details :)

Wednesday, August 22, 2012

Guest Post for Polished Prisms

I have a fun glittery mani to share with you today.  But you are going to have to head over to and see Hannah from Polished Prisms to get the details.  I love guest posting and I love her.  She is so sweet and talented.  Here is a sneak peak of my design


Thanks for having me Hannah, I enjoyed creating a Glitterific mani and I have to say, this was really fun to wear for a few days :)


Tuesday, August 21, 2012

Lazy Days of Summer: In the Garden

We all know that I have been a slacker lately.  But I have some good news, I have a new challenge mani for you :)  I went and got a mani/pedi recently and decided to amp up my otherwise crappy mani to a challenge mani.  Seriously, I am so mad at how bad my cuticles looked when I left the salon.  I thought it was just because she got too close to my cuticles when she was painting.  Not the case.  So I apologize for a not so great polish job.  But that isn't really the star of the show here any way.  I just got some of new Essie Mirror Metallics, which means more stamping polishes for me!!  I had been looking for a good gold and the Good as Gold in this collection is great!  
The inspiration for my mani is my own yard.  I don't have a garden or fancy flowers.  I do have a lot of rose bushes that line the front of my house.  They are so pretty when in bloom.  So I decided a rose garden mani was it. Plus, my nails were already red, perfect!  I have no idea what the brand or name of the red polish is, it was an off brand in the salon.  It does remind me a lot of A England Perceval.  I have a post on that lovely HERE
Alrighty, so here it is :)

Base Coat:  Unknown
Base Color:  Unknown
Stamping Plate:  Bundle Monster BM 306
Stamping Polish: Essie Good as Gold
Top Coat:  Unknown

I took this photo in the shade so the sun wouldn't wash out the gold.  I wore this for a couple days, I really enjoyed this mani :)

Friday, August 17, 2012

Guest Blogger Friday: Geeky Owl

Happy Friday!  Today's guest blogger is Kirsten from Geeky Owl.  I am so happy to have her here today.  She has a great blog and I love all her mani's.  I especially love this one she is sharing with you today.  I can't wait to try this one out :)

*********************************************************************************


Hello all! My name is Kirsten and I have a blog over at Geeky Owl. Mandy asked if anyone would love to do a guest post for and I gladly offered! I've gotten to know Mandy through a few groups that we are in together on facebook! She has even done a guest post for me too! I love the polish community!

So today I thought I would push my comfort zone and go a bit beyond what I normally do. Tape manis. Now, I've done at least one before and wasn't all that impressed. But I saw this Nude Zigzag on Nailside and thought, hey I can do that! Hopefully! >_<

Here is how it turned out:


And can I just saw....that I am a smitten kitten! I love how it turned out! I surprised even myself! hahahaha! :) Now, Nailside doesn't use a base polish on her mani. But I wanted to try and hide the little nail bruise/white thing I had going on on my ring finger and to blend some of the staining.


So I used OPI Bubble Bath as my base polish (with OPI Nail Envy as my base coat). As you can see this is the perfect polish to wear when you don't want to look like you are wearing any and to use for a french mani. But it didn't do much for the bruise/white spot thingy (and the one on the index is actually just a light glare). But it did help to lessen some of the staining! :) This polish applied wonderfully!


So if I couldn't hide it with OPI Bubble bath then by golly I could make the zigzag cover it! Success! (for the most part). I used Essence Romeo from Essence's Nail Art Twins, one of my go to greys. It is a perfect one coater that is brilliant for manis like this! Love it! So the trick to this mani is to use two pieces of tape shaped like triangles and to remove slowly. And what I learned after doing this hand and doing my right hand, it is better to remove them one piece at a time, not both together. Oh well, I still like it! :)


But I couldn't just leave it all pretty and grey right? Nope! Must add glitter! So I added Essence Julia, Romeo's Twin from Essence's Nail Art Twins. I don't often use the twins that go together, together! But I knew Julia would be the best for this mani! I love how it turned out! This is before a top coat. I took this photo then applied a top coat, waited about 5 minutes (I use Seche Vite), went downstairs and made lunch only to smack my middle finger nail on a shelf in the fridge and crumpled a bit of the mani! Waaaaaa! It was still a bit pliable so I smooshed (technical term, I promise!) back and it's better (but a little worse for wear!).

I hope you enjoyed my guest post! And thank you Mandy for letting me take some space on your wonderful blog! :)